
PRIDE Reading Program
Online Training Course Directory
PRIDE Teaching Basics
Getting to Know the PRIDE Reading Program
About the PRIDE Teaching Guide
Step 1: Introduction of New Material
Step 2: Phonological Awareness
Step 3: Sound Tiles, Letter Tiles, and Syllable Division
Step 4: Red Words
Step 5: Reading
Step 6, 7, 8: Dictation
Step 9: Fluency Practice & Progress Check
You’re All Set!
PRIDE Teaching Basics
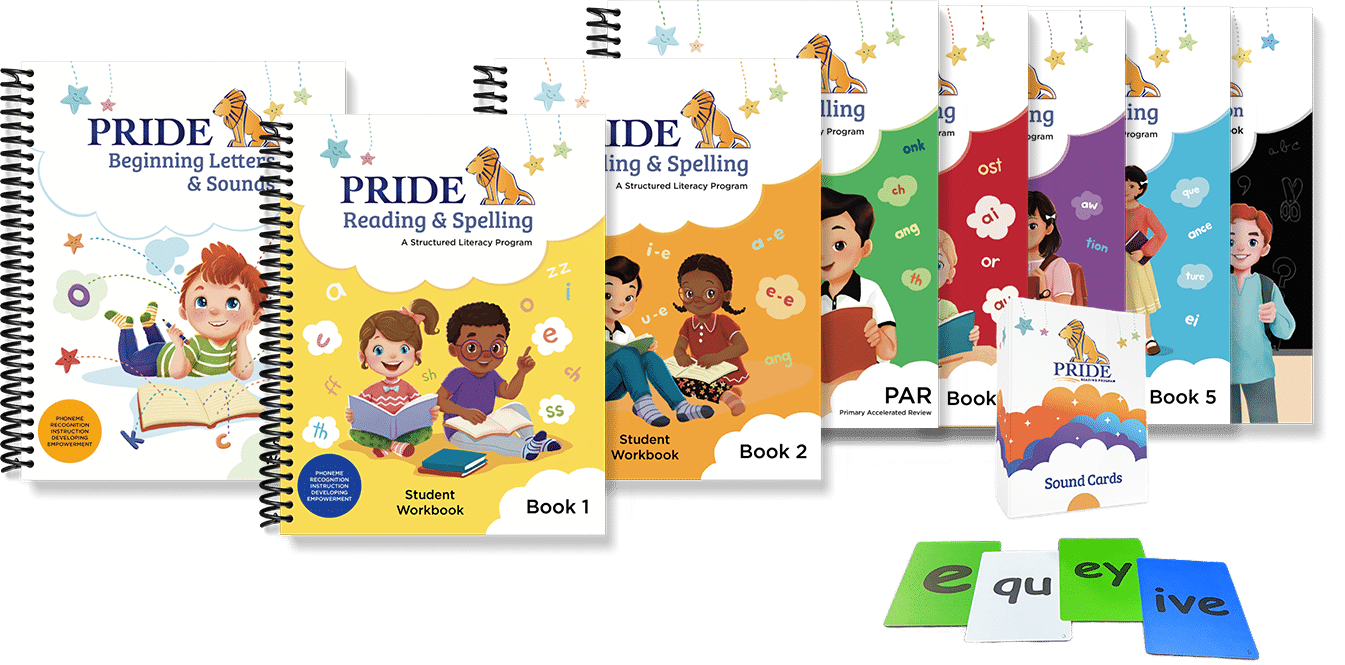
Welcome to PRIDE Reading Program! We are so excited you are here! This PRIDE Reading Program training course will provide you with an understanding of how to teach the PRIDE Reading Program and implement it with your learner.
After completing this training course, you will be able to teach with the PRIDE Reading Program. This training course will walk you through each step of the program with video demonstrations so that you can watch it in action.
The PRIDE Reading Program is a scripted, open-and-go program developed for busy instructors who want to teach reading, writing, spelling, and comprehension in the most effective and easiest way possible. The PRIDE Reading Program doesn’t require long training sessions and you don’t have to develop your own lesson plans. Everything is laid out for you step-by-step. If you ever need a substitute instructor or paraprofessional to teach for you, they can follow the scripted lesson plans.
“What is Taught in the
PRIDE Reading Program?”
The PRIDE Reading Program is designed to bring the effectiveness of structured literacy instruction approach to all learners. The PRIDE program helps to address and prevent reading and spelling gaps for all learners and is the ideal way to ensure that they receive the science-based phonics instruction that they need.
Phonological Awareness
You will instruct how to listen to a single word or a single syllable and break it into individual sounds. You will also instruct your learner on how to take individual sounds and blend them into words, change sounds, compare sounds, delete sounds, and manipulate sounds. Phonological Awareness is taught throughout the entire PRIDE Reading Program in all 6 levels.
Systematic Phonics
You will instruct your learner on how to blend and connect the graphemes (letters) with phonemes (sounds) using a clear and well thought out scope and sequence. This includes:
- consonant and short vowel sounds
- Digraphs and blends
- Long vowels and other vowel patterns
- Six Syllable patterns (closed, open, Silent E, r-controlled, vowel pair/diphthong, consonant-le)
- Affixes
Fluency and Reading Comprehension
In the PRIDE Reading Program, learners are taught the relationship between word meanings and the meaning of groups of words. Relationships between words, phrases, clauses, and sentences are explicitly taught and lead to reading and comprehending paragraphs, text, and stories.
Spelling Rules and Grammar
Every spelling rule in the English language will be taught in the PRIDE Reading Program. You will teach your student how to read, write, and spell with these spelling rules. Grammar lessons are taught throughout the entire PRIDE Reading Program in all six levels.
“What Kind of Support Can I Get?”
We are here to help you. We are HUGE advocates of the Orton-Gillingham approach.
We offer free unlimited support to anyone using the PRIDE Reading Program. We are here to answer your questions and help you use the PRIDE Reading Program with your learners.
Please always feel free to call us at 1-866-774-3342 ext. 2 or send us an email at info@pridereadingprogram.com
Now…please continue on with this training course!
Getting to Know the PRIDE Reading Program
The PRIDE Reading Program consists of five components that you will use during your lessons. Let’s get started!
Online/Printed Teaching Guide


Optional Add-on*
The PRIDE Teaching Guide is the key to the entire PRIDE Reading Program. The Teaching Guide will tell you which skills to teach, when and how to teach them, as well as give you all the words, sentences, and activities you need to do with your learner. The PRIDE Teaching Guide has been designed and created in a way to keep the PRIDE instructor and learner on track and following the program as designed.
The Student Workbook
*Yellow Book “initial r blend” sample pages
This consumable book includes decodable word lists, sentences, and stories that allow your learners to apply, reinforce, and master new concepts. Unillustrated reading passages help the learner focus directly on decoding strategies for word recognition. The consumable format of the Student Workbook allows learners to mark word lists and highlight passages as they identify and practice new concepts. The Teaching Guide provides explicit instruction for all Student Workbook pages.
- Contains words, sentences, and decodable stories for developing accurate and fluent reading and comprehension
- Quick Progress Checks to determine learner’s progress
- Spelling paper
- Picture Page
- Graphic Organizer for comprehension and writing practice
- Fluency Practice Pages
- Word Games
PRIDE Sound Cards
PRIDE Sound Cards are used throughout the program to introduce letters, sounds, and reviewing skills. The PRIDE Sound Cards cover all levels of the program and are color-coded by level. They are used in daily automaticity drills. The cards are color-coded similarly to the Letter Tiles. White for consonants, green for vowels, blue for prefixes and suffixes, and yellow for less common pronunciations.

PRIDE Letter Tiles and Activity Kit
The PRIDE Letter tiles are color-coded for each letter sound concept and are used throughout the program to learn sounds, blending, and word building. The cards are color-coded similarly to the Sound Cards. White for consonants, green for vowels, blue for prefixes and suffixes, and yellow for less common pronunciations.
PRIDE Letter Tiles are durable and ready to use on any flat surface. There will be blank green and white tiles included. Do not throw them away! These blank tiles are used as sound tiles for the Sound Tiles activity! To see what letter tiles are needed for each book level and how to lay it out, click here!
You will need a 12″x9″ dry-erase board with black and red pens, a whiteboard eraser, a reading tracker, and a game die. All items are required during instruction.


⇨ Now that you’ve become acquainted with the components of the PRIDE Reading Program, let’s learn more about the PRIDE Teaching Guide!
About the PRIDE Teaching Guide
Optional Add-on*
The PRIDE Reading Program Online Teaching Guide is an invaluable resource that includes step-by-step instructions for you whether you are a new or experienced instructor. This easy-to-use Teaching Guide requires only 30-40 minutes of instruction a day. The scripted lesson plans will support instruction for you in every step of the PRIDE Program giving you the opportunity to teach with great success.
Lesson Format
Each concept that you teach is divided into three sections. Each new concept is first presented in the Introduction Lesson, then practiced along with previously taught concepts in the Practice Lesson, and then spiraled through to the Reinforcement Lesson, providing a comprehensive review. Each lesson is organized in a way that makes it easy for you to engage your learner in explicit, systematic, and multisensory reading instruction.
The Teaching Guide must be used in conjunction with the Student Workbook. It cannot be used by itself.
Levels 1-5 follow a consistent 10 Step Lesson structure for each concept covered. These include:
- Sound Cards
- Phonological Awareness
- Red Words (Sight Words)
- Word Building with Letter Tiles
- Reading Words, Sentences, Stories
- Fluency Practice
- Game and Activity
- Dictation of Sounds, Words, Sentences
- Progress Check
To learn which concepts are covered in each level, visit the Scope and Sequence HERE.
Schedule and Pacing
The Introduction, Practice, and Reinforcement lessons are designed to take between 30 and 40 minutes each to complete. There are optional Online Practice Games and Extra Learning Activities at the end of each lesson for additional practice.
Day 1: 30-40 minutes
Introduction Lesson (Steps 1-10)
Day 2: 30-40 minutes
Practice Lesson (Steps 1-9)
Day 3: 30-40 minutes (Steps 1-9)
Reinforcement Lesson (Steps 1-9)
60 Min PRIDE Lesson
- 5 days/week
- Steps 1-10
- 3 months per level
30 Min PRIDE Lesson
- 5 days/week
- Day One/ Steps 1-5
- Day Two/ Steps 6-10
- 6 months per level
Do not feel like you need to push through an entire lesson in one sitting. If your learner needs more time with an individual step in the program simply mark your place in the ‘Student Notes’ section in the back of the Student Workbook. The next time you work with your learner, start off with a quick Sound Card review and then pick up where you left off.
Some concepts may take a week or more to complete. A number of variables including your learner’s age, attention span, and the difficulty of the concept being taught will play a part in how quickly a skill will be learned.
Progress Checks
Progress Check assessments are available to test each concept in the PRIDE Reading Program. There is one Progress Check per concept. Once learners achieve 80% mastery on the Progress Check, they are ready to move on to the next concept. If the learner does not reach 80% mastery, you might want to further teach the concept by teaching the Introduction, Practice, and Reinforcement Lesson again. If they are close to 80% mastery, you will want to proceed to the next concept, because the lessons’ spiral design will provide continued practice throughout the program.
Teaching Prompts
The Teaching Guide will prompt you to preview the sounds before you teach them to your learner by listening to a sound clip. If English is not your first language, these sound clips will help you pronounce the sounds you are teaching correctly.
You will notice some symbols in your script. As a way to represent the sounds of letters in the Teaching Guide, we use slashes. For example, /m/ stands for the spoken sound mmmm (as in mittens).
- A smile above a letter, as in /ă/ represents the short vowel sound (as in apple).
- A straight line above a letter, as in /ā/, represents the long vowel sound (as in ape).
When the text is black, that is your teaching directions and when the text is “blue”, that is your script to read aloud to your learner.
⇨ Occasionally you may come across a discrepancy in your teaching
guide depending on the printing date of your workbook. If this occurs, please improvise using your student’s workbook.
Teaching with Fidelity
In order for your learner to reach and exceed grade level reading, you will need to teach the PRIDE Reading Program with fidelity. This means teaching the program exactly as designed. Take your time, go slowly, and make sure that your learner completes every step and every lesson in the program.
In the upcoming units, you will be watching videos to learn how to teach the PRIDE Reading Program. At the end of each video, you have the opportunity to practice reading the script for each step in the Online Teaching Guide and get comfortable with the process before you start instructing.
Practice Games
Our PRIDE Reading Specialists have created over 350 games for every concept taught from Beginning Consonants through our Purple Book. You can use the practice games as independent learning time to help reinforce and review the concepts taught in PRIDE. Of course, if screen time is limited in your lessons then you can skip the practice games. The games are there as extra reinforcement only if it is right for your teaching style. Save the link below for your practice games!
Step 1: Introduction of New Material
Sound Card Review
The instructor reviews all previously learned concepts as a warm-up. The instructor shows the sound card to the learner. The learner gives the letter name and its sound.
Watch this video to see a demonstration of a Sound Card Review.
Sound Cards
Review and Drill – beginning consonant cards ( b, c, d, f, g, h, j, k, l, m, n, p, r, s, t, v, w, x, y, z)
“When I hold up a letter, say the letter’s name, and give its sound.”
“Good job! We are going to learn to read and spell with short vowel a today.”
Step 1: Picture Page
≫ Introduction Lesson ≪
The instructor will introduce a new concept to the learner with a Picture Page. The Picture Page helps the learner create a visual memory of the concept.
Watch this video to see a demonstration of a Picture Page lesson.
Picture Page
Student Workbook Page 3 – a – apple
Say, “The name of this letter is a. What is the name of this letter? The letter a is a vowel. The picture page for letter a is apple. Say apple. Good. When I point to the picture page, say the letter’s name, give its sound, and say the picture word. Watch me as I demonstrate.”
Say a, /ă/, apple. Have student repeat three times.
Step 1: Sky Writing
≫ Practice Lesson ≪
The instructor will ask the learner to say the sound first, then write the letters in the air, saying the sound at the same time. This helps the learner memorize the formation of the letters and also the sound that it connects to.
Watch this video to see a demonstration of a Sky Writing lesson.
Sky Writing
Hold up a Sound Card.
“Stand up and extend your arm all the way out in front of you. Ready?”
/ă/ (Say the sound.) a (Say the letter as you Sky Write.) /ă/ (Underline the sound and say the sound.)
Have student repeat three times.
Step 1: Blending Drill
≫ Reinforcement Lesson ≪
The instructor separates the Sound Cards into three (sometimes four) piles. The instructor keeps flipping the cards from the different piles to form nonsense words. Nonsense words force the learner to practice the sounds in isolation and also to use decoding and not memorization skills.
Watch this video to see a demonstration of the Blending Drill.
Blending Drill
Place Sound Cards in three stacks:
First Stack – ( c, f, g, h, j, l, r, s, v, w, y, z )
Second Stack – ( a )
Third Stack – (b, d, m, n, p, t, x )
Have student place their finger under each stack and say the sound from left to right. Then have them read the nonsense word.
Turn the cards from the First Stack and the Third Stack to create new nonsense words.
Step 2: Phonological Awareness
Step 2: Sound Identification
≫ Introduction Lesson ≪
The instructor will ask the learner to close their eyes and listen for sounds. This helps the learner focus attention on the concept they are learning and promotes brain connections between what is heard and what is said.
Watch this video to see a demonstration of a Sound Identification lesson.
Phonological Awareness
“Close your eyes. I will say a word. You will repeat the word and listen for the /ă/ sound. If you hear /ă/, raise your hand. Let’s practice. Say hat. Do you hear the /ă/ sound in hat? Yes, you hear the /ă/ sound in hat so you raise your hand. Good. Let’s practice some more words.”
Repeat with:
bat, man, hit, at, cat, pen, fat, nap, sock, bag
Step 2:
Sound Deletion and Substitution
≫ Practice Lesson ≪
The instructor will ask the learner to repeat words and give the first, middle and last sounds of the words. The instructor will also ask the learner to change and manipulate sounds in the words. This helps the learner hear and separate the individual sounds in spoken words.
Watch this video to see a demonstration of a Sound Deletion and Substitution lesson.
Phonological Awareness
“Say rat. Say rat again but this time, instead of /t/, say /g/.” (rag)
“Say cab. Say cab again but this time, instead of /k/, say /l/.” (lab)
“Say jam. Say jam again but this time, instead of /j/, say /y/.” (yam)
“Say man. Say man again but this time, instead of /n/, say /p/.” (map)
“Say wax. Say wax again but this time, don’t say the /w/.” (ax)
“Say yap. Say yap again but this time, instead of /y/, say /t/.” (tap)
Step 2:
Sound Providing and Rhyming
≫ Reinforcement Lesson ≪
The instructor will ask the learner to give the names of sounds in isolation and also in chunks as well as rhyming words. This helps the learner focus on all of the individual sounds within each word.
Watch this video to see a demonstration of a Sound Providing and Rhyming lesson.
Phonological Awareness
Write the word pat on the whiteboard. “What is this word?”
“What letter says /p/?”
“What letter says /ă/?”
“What letter says /t/?”
“What two letters say /ăt/?”
“What does the letter p say?”
‘What does the letter a say”?”
‘What does the letter t say’?”
“What do the letters at say?”
“Say pat. Say pat again, but change the /p/ to /k/.” (cat)
Step 3: Sound Tiles, Letter Tiles, and Syllable Division
In the PRIDE Letter Tiles bundle, there will be blank green and white tiles. They go together with the Boxes on the back covers of the Yellow and Orange Student Workbooks. Please take a moment to read about how to prepare and place your letter tiles on the table in this post:
Step 3: Sound Tiles
≫ Introduction Lesson ≪

The learner will use the back cover of the Student Workbook and the blank green and white tiles for this step. The learner will listen to a word and then move the sound tiles into a box for each sound in the word. Each tile represents a sound. The consonants are white and the vowels are green.
Watch this video to see a demonstration of a Sound Tile Lesson.
Sound Tiles
Use the back cover of the Student Workbook and the blank green and white sound tiles for this activity.
Say, “How many sounds do you hear in the word bat? Yes, you hear three sounds. Repeat the word and bring down a sound tile for each sound you hear. Remember to use white tiles for consonant sounds and green tiles for the vowel sound. Touch each tile and say its sound. Then glide your finger under the tiles and say the whole word fast.”
Repeat with:
ran, sat, sag, tab, dad, mat, fan, lap, can, tab
Step 3: Letter Tiles
≫ Practice and Reinforcement Lesson ≪
The learner will build and manipulate words with letter tiles and then blend the letters together to read words.
Watch this video to see a demonstration of a Letter Tile lesson.
Letter Tiles
“Say jam.”
“Bring down the letters for each sound in jam. Read the word again. Now put all the letters back where they belong.”
Repeat with:
tab, sad, mad, gas, ran, yap, hat, bat, pan, lap
Step 4: Red Words
Step 4: Red Words
Introduction, Practice, and Reinforcement Lesson
Step 4 always begins with a review drill of Red Words (sight words) already learned. The instructor will drill all of the learned Red Words first before teaching a new red word. The red words are located in the back of the book.
There will be a Mastery Check every three concepts. It will say the following:
Mastery Check – If the student can say the red word within three seconds or less, place a black check mark next to the word. A black check means the student has mastered the word and can now be reviewed once in awhile but daily review is not necessary.
Watch this video to see a demonstration of a Red Word lesson.
Red Words
Write the word the on the whiteboard. Say, “This is the word the.”
“What is this word? Point to the word. Slide your pointer finger under the word while you read it.” Have student repeat this three times.
“Now, stand up. Spell the word, tapping once for each letter down your arm. Then read the word again while sliding your hand from shoulder to wrist.” Have the student repeat this three times.
“Now write the word in a red marker on the whiteboard saying the letters aloud as you write and underline the word as you read it.” Have the student write, read, and underline three times.
“Can you give me the word in a sentence?”
Turn to page 156 and put a red check mark next to the word the.
Step 5: Reading
Step 5: Reading Words
≫ Introduction Lesson ≪
Learners will practice reading the new concept by underlining, linking, dividing, and boxing letters and letter combinations in words. The instructor will teach the learner strategies to read difficult and multisyllabic words.
Watch this video to see a demonstration of a Reading Words lesson.
Reading
Student Workbook Page 4 – Word List: Short a
“Put your finger under the first word. Underline the vowel. What is that sound? Now read the word.”
Repeat with the remaining words, reading left to right.
Step 5: Reading Sentences
≫ Practice Lesson ≪
The instructor will ask the learner to read a list of sentences. These sentences are decodable and use a specific skill that they are working on. The instructor will ask the learner to read a sentence first quietly in his or her mind. Then the instructor will ask the learner a comprehension question. Finally, the learner will read the sentence again aloud with fluency and expression.
Watch this video to see a demonstration of a Reading Sentences lesson.
Reading
Student’s Workbook Page 4 – Sentences Short a
“Look at the first sentence. Put your finger under the first word in the sentence. Now read the sentence quietly in your head and look at me when you are finished and I will ask you a question.”
When the student looks up at you, you will ask the student a comprehension question. Then have the student go back and read the sentence aloud.
Repeat with:
Max can pat the cat.
“What animal can Max pat?” (the cat)
Dan has a hat.
“Who has a hat?” (Dan)
The man sat.
“What did the man do?” (sit/sat)
Step 5: Reading a Decodable Text
≫ Reinforcement Lesson ≪
The learner is introduced to a decodable story. The stories are always decodable and only contain sounds and concepts that the learner has already learned. Comprehension and Vocabulary development are also a continual process through the entire reading of the story. The instructor will ask the learner to visualize, use prior knowledge, use context clues, and other reading comprehension strategies. After reading through the story step by step, the learner will fill out a graphic organizer. By reading the story, filling out the graphic organizer and completing all the activities required, your learners will become very strong summarizers. Summarizing is a key element in reading comprehension.
Watch this video to see a demonstration of a Reading a Decodable Text lesson.
Reading
Student Workbook Page 5 – Reading Passage: The Cat
“Look at the title of this story. Can you read it out loud? What do you know about the topic of this story?” (Have you ever seen, known or been…Help student connect to the text.)
“Now, read the first two sentences quietly in your head and look at me when you are finished and I will ask you a question.” When the student looks up at you, ask “What do you think will happen next? Why?” (Help student predict.)
“Now, read the next two sentences quietly in your head and look at me when you are finished and I will ask you a question.” When the student looks up at you, ask “Tell me what you were imagining in your mind as you read those sentences.” (Help student visualize the story by making pictures or movies in the mind.)
“Now, read the last two sentences quietly in your head and look at me when you are finished and I will ask you a question.” When the student looks up at you, ask “What were the most important events in this story?” (Help student determine importance.)
Go back to the beginning of the story and have the student read the entire story from the beginning to the end out loud.
Student Workbook Page 6 – Graphic Organizer
Have the student verbally express what happens at the beginning, middle and the end of the story. (Help student summarize the story.) Then have the student fill out the graphic organizer with a pen. Depending on the student, either have him draw pictures, write words, write sentences, or write an entire paragraph.
Step 6, 7, 8: Dictation
Step 6: Sound Dictation
Introduction, Practice, and
Reinforcement Lesson
The instructor will dictate ten sounds and the student writes the sounds in the Student Workbook. The student will first write the sound on his/her palm. Then the student will write the sound in the Student Workbook. The student then follows up by reading each sound back to the instructor.
Watch this video to see a demonstration of a Sound Dictation lesson.
Sound Dictation
Student Workbook Page 7 – Sounds
“Say /ă/. With your finger, write the sound /ă/ on your palm. Now pick up your pen and write the sound /ă/ on your paper.”
Repeat the above activity with each of the following sounds:
/j/, /l/, /v/, /n/, /y/, /b/, /x/, /s/, /ă/
Have the student go back and read each sound that they have written aloud to you.
Step 7: Word Dictation
Introduction, Practice, and
Reinforcement Lesson
The instructor will dictate ten words and the learner will write each of the words in the Student Workbook. The learner then follows up by reading each word back to the instructor.
Watch this video to see a demonstration of a Word Dictation lesson.
Word Dictation
Student Workbook Page 7 – Words
“Say cat. Spell the word cat by writing the letters on your palm. Now pick up your pen and write the word cat on your paper.”
Repeat with the above activity with each of the following words:
mad, tag, pat, zag, had, lag, fat, fan, bad
Have the student go back and read each word that they have written aloud to you.
Step 8: Sentence Dictation
Introduction, Practice, and
Reinforcement Lesson
The instructor will dictate three sentences and the learner writes the sentences in the Student Workbook. The learner then follows up by reading each sentence back to the instructor.
Watch this video to see a demonstration of a Sentence Dictation lesson.
Sentence Dictation
Student Workbook Page 7 – Sentences
“Listen carefully as I say a sentence and watch as I make a dash on the whiteboard for each word in the sentence.”
The man ran.
“Now, you say the sentence as you point to each dash. Now, you fill in each dash with each word from the sentence. Good. Now go back and read the sentence that you just wrote.”
Repeat the above with the following sentences, but this time in the student workbook instead of the whiteboard:
The fat cat sat.
Jan has a van.
Step 9: Fluency Practice & Progress Check
Step 9: Fluency Practice
Introduction, Practice, and
Reinforcement Lesson
Learners are given a fluency practice drill and with a marker across the first line, they read the words as quickly as they can. They will do this with every line increasing their speed over time. Not every fluency practice follows the skill that is currently being taught. Sometimes, the program directs the instructor to go back and practice and review skills from the past.
Watch this video to see a demonstration of a Fluency Practice lesson.
Fluency Practice
Student Workbook Page 122 – Fluency Practice 1
Place a reading marker under the first row. Going across the row, have the student read each word as quickly as they can. Be cautious, as some students will become very anxious if they feel any time pressure. Never push for speed at the cost for accuracy. Accuracy is more important than speed. If the student will tolerate it, have the student do all 15 rows.
Step 10: Progress Check
Reinforcement Lesson
Learners are assessed at the end of each lesson. Data driven instruction with continual practice and reinforcement ensures measurable and permanent gains in reading, writing, spelling, and comprehension.
Watch this video to see a demonstration of a Progress Check.
It is time for a Progress Check!
Student Workbook Page 116 – Progress Check: Short a
Have your student read the words and sentences out loud. If they get approximately 80% or more correct, then they are ready to move onto the next unit.
Congratulations!
You have completed our PRIDE Reading Program Training course! You can always refer back to this training course if you need more practice with an activity.
Please feel free to reach out! We are here to help!
866-993-4649 ext. 2
info@pridereadingprogram.com